")
")

Open an image
In order to work on the files in an image, you have to open it. This is simply done with the open function in the file menu.
You can only open disk images - this is the base of all operations in TIImageTool. You cannot "open" a single exported TIFILES file; it does not even make sense here. What you can do if you have a single file is that you create a floppy disk image, and then you import the TIFILES file into that newly created image. Then you may, for instance, click on the file to see its content. Remember that you don't need to save the disk image when you are done. So you'd just create the floppy image with Ctrl-N, drag and drop the file into the new image, open the file in the image, and finally close the image without saving.
Also, you cannot "open" a directory that contains TIFILES files, since this is not a disk image either. However, this could be a future enhancement of TIImageTool - it would require to simulate a disk image on-the-fly that contains all files of a specific directory on the PC file system.
Open an image is also invoked when you press Ctrl-O.
In the file dialog, you may select more than one image for opening - all the selected images will be opened when you click on OK.
Floppy and unpartitioned hard disk
Opening an existing image is straight forward; you simply double-click on the file in the file dialog. The image format is automatically determined. Of course, you can also type in the file name in the file name field and hit Return.
You can open an image more than once. For each opened view you get a separate tab, and when you change the image, you will notice that all tabs of the same image are tagged as changed (asterist before the image name). This may be useful when you work in different directories of the same image - you can detach a tab and then perform the simple drag-and-drop operation between the views.
Partitioned IDE drives and CF7 images
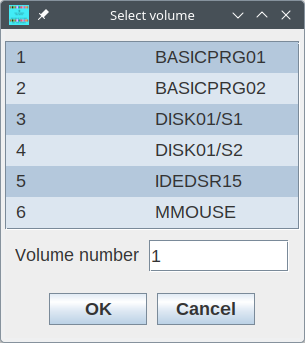
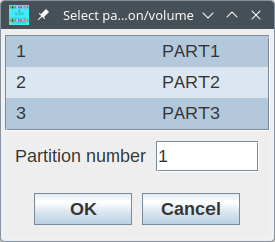
After selecting the partition or volume, the contents will be shown as with every other image. However, there is a catch: Unlike floppy and unpartitioned hard disk images, you only see a part of the file, not the whole image file. You cannot open multiple partitions or volumes of the same image, since this would mean to open the same image in different locations, which may cause corruptions in certain formats, especially the MAME CHD format (which uses a common table for allocated parts).
This makes it a bit cumbersome to transfer data between different partitions or volumes of the same image: You have to set up an intermediary image where you copy your files to, then close the partitioned image, then re-open it at the target partition/volume, finally copy the files there from the intermediary image. Alternatively, you can export the files to your PC file system, then import them in the newly opened partition or volume.
Close view
This is an obvious feature; closing a view removes the tab or the window in detached state. When you close an image without saving the changes, you will get a warning dialog which allows you to cancel the closing (or to continue and discard the changes).
Note that you can have more than one open view of the same image; all those views are shown as changed if any change was applied to the image. You can close all views without getting a warning, until you close the last view - in which case you get the mentioned reminder dialog.
You can close all views in one go with "close all". Closing the currently selected view can be shortcut by Ctrl-W.