")
")

- Details
- Hits: 853
Save (as)
This is one of the really new features of TIImageTool since release 3. While all changes were immediately saved to the image file in earlier releases, now the changes are only performed in the memory image, and you need to save the changes to make them effective.
Floppy and unpartitioned hard disks
With "Save as", you have to decide which image format to use, as you see on the right for floppy and hard disk images.
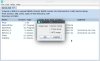 Floppy images can be saved as sector dumps (as known from the v9t9 emulator), track dumps (for PC99), or HFE images (for use with the Lotharek/GoTek floppy drive emulator).
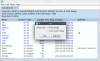 Hard disk images may be saved as raw sector dumps, but they should usually be saved as CHD files to be used in MAME. CHD files are much smaller in size than raw dumps because they store empty tracks very efficiently.
Converting from one image format to another is now strikingly simple: Just save the image by a new format. For that reason, the specific conversion functions (CHD to raw and vice versa) were removed.
If you want to save the changes to the image without creating a new file, you must use the Save function (not Save as). Of course, this function is only available when you saved the image to a file already; for newly created images, "Save" is redirected to "Save as".
Partitioned IDE drives and CF7
"Save as" will save the current volume to a specified image file. However, with partitioned images you may experience an unexpected effect: "Save as" will save only the currently opened partition / volume to a new file. If you want to save your changes back to the original, partitioned file, you have to use the "Save" function.
Remember that you have to create an empty IDE image by setting up its partition table and saving it to a file. Similarly, you have to set up CF7 images by specifying the volumes. This means that partitioned images are never pure memory images but that there is always a file that you have to open.
Export
Exporting an image means to save the contents of the image as single files on the PC file system. This allows you to store single files, to send them to someone else, or to use them in emulators that access files on the PC file system, in particular Classic99.
You can export a single file by dragging it from the opened view and dropping it into a PC folder, as explained in the General usage section. The export function in the file menu is intended to export all files of the opened image.
The TI file system uses a different set of rules than a PC file system, so you may expect tha file names that are valid on one side may be invalid on the other. For this, you can specify translation rules for exporting:
- You can specify a set of characters (as a String) that shall be replaced when the file is exported. A second string assigns the replacement characters. As an example, when we define "ABCDEF" as characters to be replaced, and "123456" as the replacement characters, the TI file name "EXBASIC" will be translated to "5X21SI3". This does not make too much sense, so usually you would replace characters like path separators (slash or backslash), periods, colons and so on. You can map different characters to the same replacement character. You can even map the character to the "empty" character, thus removing it, by setting "?" as replacement.
- TI file names are usually uppercase. If you prefer lowercase names on your PC, you can check the box "convert to lowercase".
- You can add a suffix to the names of the exported files, like ".tfi".
Note that the real TI file name is always retained inside the header of the exported file. That means that whatever name you give the file on your PC, it will - by default - use the embedded name on import. This can be changed, however, to keep the PC name (after translation).
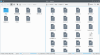 The screenshot on the right shows how the exported image looks like on the PC file system (Linux). The image that has been exported here is the one shown in the above screenshot of the saved floppy image. Two directories are visible here: In the left half you see the root directory of the floppy image; on the right you see the contents of the PICT subdirectory. That is, all contained directories are recursively exported. Since directories are not stored in special files, another file is created to keep the TI name of the directory (meta.inf).
In this example, only few conversion rules were used; the file names were kept as given in the TI image, that is, uppercase and without a suffix.
- Details
- Hits: 916
Open an image
In order to work on the files in an image, you have to open it. This is simply done with the open function in the file menu.
You can only open disk images - this is the base of all operations in TIImageTool. You cannot "open" a single exported TIFILES file; it does not even make sense here. What you can do if you have a single file is that you create a floppy disk image, and then you import the TIFILES file into that newly created image. Then you may, for instance, click on the file to see its content. Remember that you don't need to save the disk image when you are done. So you'd just create the floppy image with Ctrl-N, drag and drop the file into the new image, open the file in the image, and finally close the image without saving.
Also, you cannot "open" a directory that contains TIFILES files, since this is not a disk image either. However, this could be a future enhancement of TIImageTool - it would require to simulate a disk image on-the-fly that contains all files of a specific directory on the PC file system.
Open an image is also invoked when you press Ctrl-O.
In the file dialog, you may select more than one image for opening - all the selected images will be opened when you click on OK.
Floppy and unpartitioned hard disk
Opening an existing image is straight forward; you simply double-click on the file in the file dialog. The image format is automatically determined. Of course, you can also type in the file name in the file name field and hit Return.
You can open an image more than once. For each opened view you get a separate tab, and when you change the image, you will notice that all tabs of the same image are tagged as changed (asterist before the image name). This may be useful when you work in different directories of the same image - you can detach a tab and then perform the simple drag-and-drop operation between the views.
Partitioned IDE drives and CF7 images
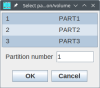 In the case of partitioned images, TIImageTool requests you to choose the partition or volume to open, as shown on the right. Partitions are used on IDE drives, while volumes are found on CF7 images.
After selecting the partition or volume, the contents will be shown as with every other image. However, there is a catch: Unlike floppy and unpartitioned hard disk images, you only see a part of the file, not the whole image file. You cannot open multiple partitions or volumes of the same image, since this would mean to open the same image in different locations, which may cause corruptions in certain formats, especially the MAME CHD format (which uses a common table for allocated parts).
This makes it a bit cumbersome to transfer data between different partitions or volumes of the same image: You have to set up an intermediary image where you copy your files to, then close the partitioned image, then re-open it at the target partition/volume, finally copy the files there from the intermediary image. Alternatively, you can export the files to your PC file system, then import them in the newly opened partition or volume.
Close view
This is an obvious feature; closing a view removes the tab or the window in detached state. When you close an image without saving the changes, you will get a warning dialog which allows you to cancel the closing (or to continue and discard the changes).
Note that you can have more than one open view of the same image; all those views are shown as changed if any change was applied to the image. You can close all views without getting a warning, until you close the last view - in which case you get the mentioned reminder dialog.
You can close all views in one go with "close all". Closing the currently selected view can be shortcut by Ctrl-W.
- Details
- Hits: 853
This menu contains all functions of TIImageTool to handle image files. Also, the general settings are found here.
- Details
- Hits: 1026
Floppy image
 This function creates a new floppy disk image. Since TIImageTool 3, this image is created in memory at this point; hence, you do not need to decide whether this will be a sector dump, a track dump, or a HFE image. This will be relevant when you save the image to your PC file system.
Still, a floppy disk file system must be set up, so this requires a volume name, and geometry data. You have to decide whether this is a single-sided or double-sided floppy disk, and what density to use: single, double, high, ultra, or double-16 (which is used with the TI-99/8 or with original TI double density controllers). Also, you have to set the number of tracks (40 or 80). All these data determine the capacity of the floppy disk.
For maximum compatibility, you should use double-sided / single density (DSSD) formats, which delivers a 180 KiB floppy disk. Most advanced disk controllers (BwG, CorComp, Myarc) support double density, which means 360 KiB. Some extensions for the TI floppy controller allow you to use 80 track disks, so you can take this option.
You can also press Ctrl-N to invoke this function.
Hard disk image
Similarly to the floppy creation, you can set up a hard disk image in memory. When you save the image, you will have the chance to decide which image format to use.
This function is also available by Ctrl-M.
There are two major kinds of hard disk images: those used with the Myarc HFDC (Hard and Floppy Disk Controller) which are called MFM drives, and those for SCSI controllers (like WHTech or ASCSI). The SCSI images can be used with the IDE controller from Thierry Nouspikel and the DSR from Fred Kaal as unpartitioned images. There is a separate function to set up a partition table, described below. Since unpartitioned IDE images and SCSI images use the same file system and image formats, these IDE images will be displayed as SCSI even when they are used for IDE.
There is a checkbox which allows you to fine-tune the image creation for the respective type (Advanced options). In most cases, you can simply accept the default values.
SCSI
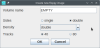
 For SCSI we do not have special types, so the option to choose is "generic SCSI". You can specify the size of the volume up to 248 MiB; this is an upper limit imposed by the TI hard disk file system. The only advanced option is the number of reserved allocation units (AUs).
MFM
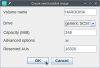
 MFM drives offer a lot of detail settings, but as stated above, TIImageTool computes suitable defaults that you can simply accept. A thorough description of all details is beyond the scope of this manual. Beside the generic MFM layout, up to 248 MiB, there are predefined layouts for three well-known MFM drives from Seagate: ST-213 (10 MiB), ST-225 (20 MiB), and ST-251 (40 MiB).
For the generic MFM layout, the options are calculated from the given capacity, that is, a geometry is chosen that delivers the desired capacity or approximates it.
Partitioned IDE image
 By this function you can define the partition table of an IDE hard disk image. This function differs from the previous ones, as you have to specify a file name under which to save the new image. The reason is that TIImageTool works with volumes in memory, but this image is a collection of volumes.
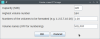
You have to provide the overall capacity of the IDE image (across all partitions). As we can define up to 8 partitions (with IDE DSR v15), the maximum usable size is 8*248 MiB = 1984 MiB.
The partitions must be set up contiguously, that is, you must not skip partitions. If you define 4 partitions, these must be 1 through 4.
TIImageTool suggests the partition size as the remaining space on the image. If you want to create more partitions, you have to change that suggestion to a smaller number.
After clicking on OK, the partitions are formatted, and the image is saved to your PC file system under a file name that you can choose in the file dialog.
The shortcut to this function is Ctrl-I.
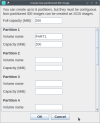
CF7 image
 Similarly to the IDE setup, the Compact Flash image setup lets you define the volumes on the image and then stores the image on the PC file system.
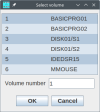
The CF7 image consists of equally-sized volumes of 400 KiB each. Logically, the volumes resemble floppy disks with 1600 sectors each. You can define as many volumes as fit on a CF7 image of the given size; after you specify the full capacity, the number of volumes is computed from it.
You do not need to format the whole CF7 image from the start. Maybe you start with 10 volumes and add more volumes later; this is possible with the "Edit CF7" function in the Utility menu. You can set up any volume in that space, and you can leave volumes undefined. For this, you can specify which volumes to format: x - y means to format volumes from number y to number y inclusively. Single volumes can be defined by their number. You can compose this specification in the entry field as you like.
All specified volumes are formatted after you click on OK. To assign a name to the volumes, you can type in a string in the last field. If you want the volumes to get numbered names (like VOL001, VOL002, ...), you may use the hash character as shown in the screenshot on the right.
Again, we have a shortcut: Ctrl-7.
Note: You cannot format a CF7 card with TIImageTool directly. Instead, you can create an image file that you have to write on the CF7 card after you saved the changes. For this, a separate tool is required like "dd" in Unix-based systems (typically part of the operating system), or the ported tool dd for Windows. The reason is that TIImageTool can access the CF7 card only with elevated privileges, which is inherenty dangerous for your data safety and security. For that reason, I leave it up to the special tools.